
The finished design will look like this and be made to have any number 'rows' of diamonds. For my stars I use a total of 5 different fabrics and I like to do so in a star burst type of layout, going from light to dark or dark to light. There are obviously no wrong answers when choosing fabrics so this design can create an extremely creative and visually exciting result.
For those of you who follow my blog you know that I like to simplify when ever possible. There is a simple way to achieve this design using strip piecing. I'm a bit of a strip piecing broken record, I know. However, I figure I'd show the old fashioned way of piecing these together as well as the easier strip piecing method as I've seen both within quilting instruction and pattern books.

After fabrics are chosen, the basics of this design is to build a 45 degree diamond made up of other 45 degree diamonds. This is done by piecing three rows of diamonds [as noted by the three arrows within this photo] and then piecing the three rows of diamonds into one 45 degree diamond. This is then repeated 8 times and those larger diamonds will form an 8 pointed star. I'll explain both ways to achieve this, traditional piecing and strip piecing.
 |
| Step 1 |
Traditional Piecing Method
Step 1 - When using traditional piecing you would cut all your fabrics into 45 degree diamonds. You'd then be tasked with piecing each 'row' as noted above one diamond at a time.
 |
| Step 2 |
Step 2 - When piecing together diamonds [or any of the 45 degree cuts in this design] the tendency is to want to lay both edges exactly together. However if that is done your diamond points will not line up properly. The method for making these shapes connect with a straight line when the connected is to off - set the point of the overlapping diamond by 1/4 inch. Which is the same as your seam allowance. See small overlap on the top left of the two fabrics.
 |
| Step 3 |
Step 3 - Join the two diamonds making certain that your seam allowance is exact and that you maintain that seam through the whole project. The success you have with this project will depend on how exact you are with your seams here. The photo on the right is a bit difficult to see, but the seam begins at the intersection of the overlapping fabric, this will ensure that when the fabrics are pressed that they form a straight line.
 | |
| Step 4 |
Step 4 - Press the seam and your result, if you have off set your piecing by the proper 1/4 inch and maintained that seam allowance properly will be that the pieces fit and form a straight line across the top, which will become the joining point for piecing the strips of 3 pieced diamonds together.
 |
| Step 5 |
Step 5 - Repeat with all three diamonds for each row and use the same overlapping method for piecing each strip of 3 connected diamonds to form a larger diamond.
Strip Piecing Method
Step 1- When strip piecing your first step after choosing your fabrics is to, as the name implies, cut strips of each. With a star of this size, that contains 3 rows of fabrics. If you were to number your fabrics by color it would illustrate a bit easier the number of strips you would need of each color. For example; the first set of 3 strips that you would join would be colors 1+2+3, you would then join colors 2+3+4 and finally colors 3+4+5. So you can see that you need more yardage of the most prevalent fabric in the group of five, which in this size star is fabric #3. To avoid too much wasted fabric I suggest sewing the strips together with each consecutive strip off at the top edge by the same number if inches as is the width of the strip since you'll be cutting these on a 45 degree angle. I've taken this photo with my blue 45 degree template to show the placement of the strips in relation to the top edges.


Step 2 - Once the three strips are sewn together creating the sets of 3 are as easy as cutting the joined strips on a 45 degree angle. A common mistake here is to measure the width of your cut on the outside of the joined strips. The actual measurement is the depth of the cut and that can be achieved by placing your ruler at 45 degrees, make the first cut, then measure the cut edge in by the width of your diamonds.
 |
| Step 2 - 45 degree cuts |
 | |||||||||||||||||
| Step 2 - completed strips, getting ready to assemble the star |
 Step 3 - Assemble the three strips in much the same manner that we pieced the diamonds above using the traditional piecing method. This includes leaving an overlap the same size of your seam allowance of 1/4 inch. Continue and create 8 star points. One thing that I do during this step that you may not find in any other instruction is that I press every other diamond opposite each other. I do this for a few reasons; first that my sewing machine has an easier time powering over those seams, secondly seams that go in opposite direction are less bulky in the end and it I certainly have an easier time viewing the seams and where they will intercept prior to sewing them. Since I've gone through the trouble to press my seams from 4 pieced diamonds opposite to the other 4 before I continue with putting the star together I do somewhat of a dry run and lay each diamond out to plan assembly.
 |
| Star points arraigned upside down on my cutting table. |
 | ||||
| Alternating seams. |
Step 4 - Assembling the star is the next step, and as you can see in the photo at the top of this post I've created the green star with diamonds rather than creating a square 'block'. However, for instruction sake I will demonstrate putting the star within a square block. With an 8 pointed star there are 4 corners which require squares be pieced in and 4 sides which utilize right triangles. The order of the assembly is to piece the square corners first, followed by the triangles. This I suppose is not a hard and fast rule, but it is what has worked best for me. When joining the three shapes; two star points and one intersecting corner square, you first need to join the star points leaving at least your 1/4 inch seam allowance at the top of the connecting seam. When that seam is complete do not press it yet, instead separate the two and sew in the side of the intersecting square,flip it over and continue to do the same for the other side of the square. This is intersection is one of the most tricky parts of this project.


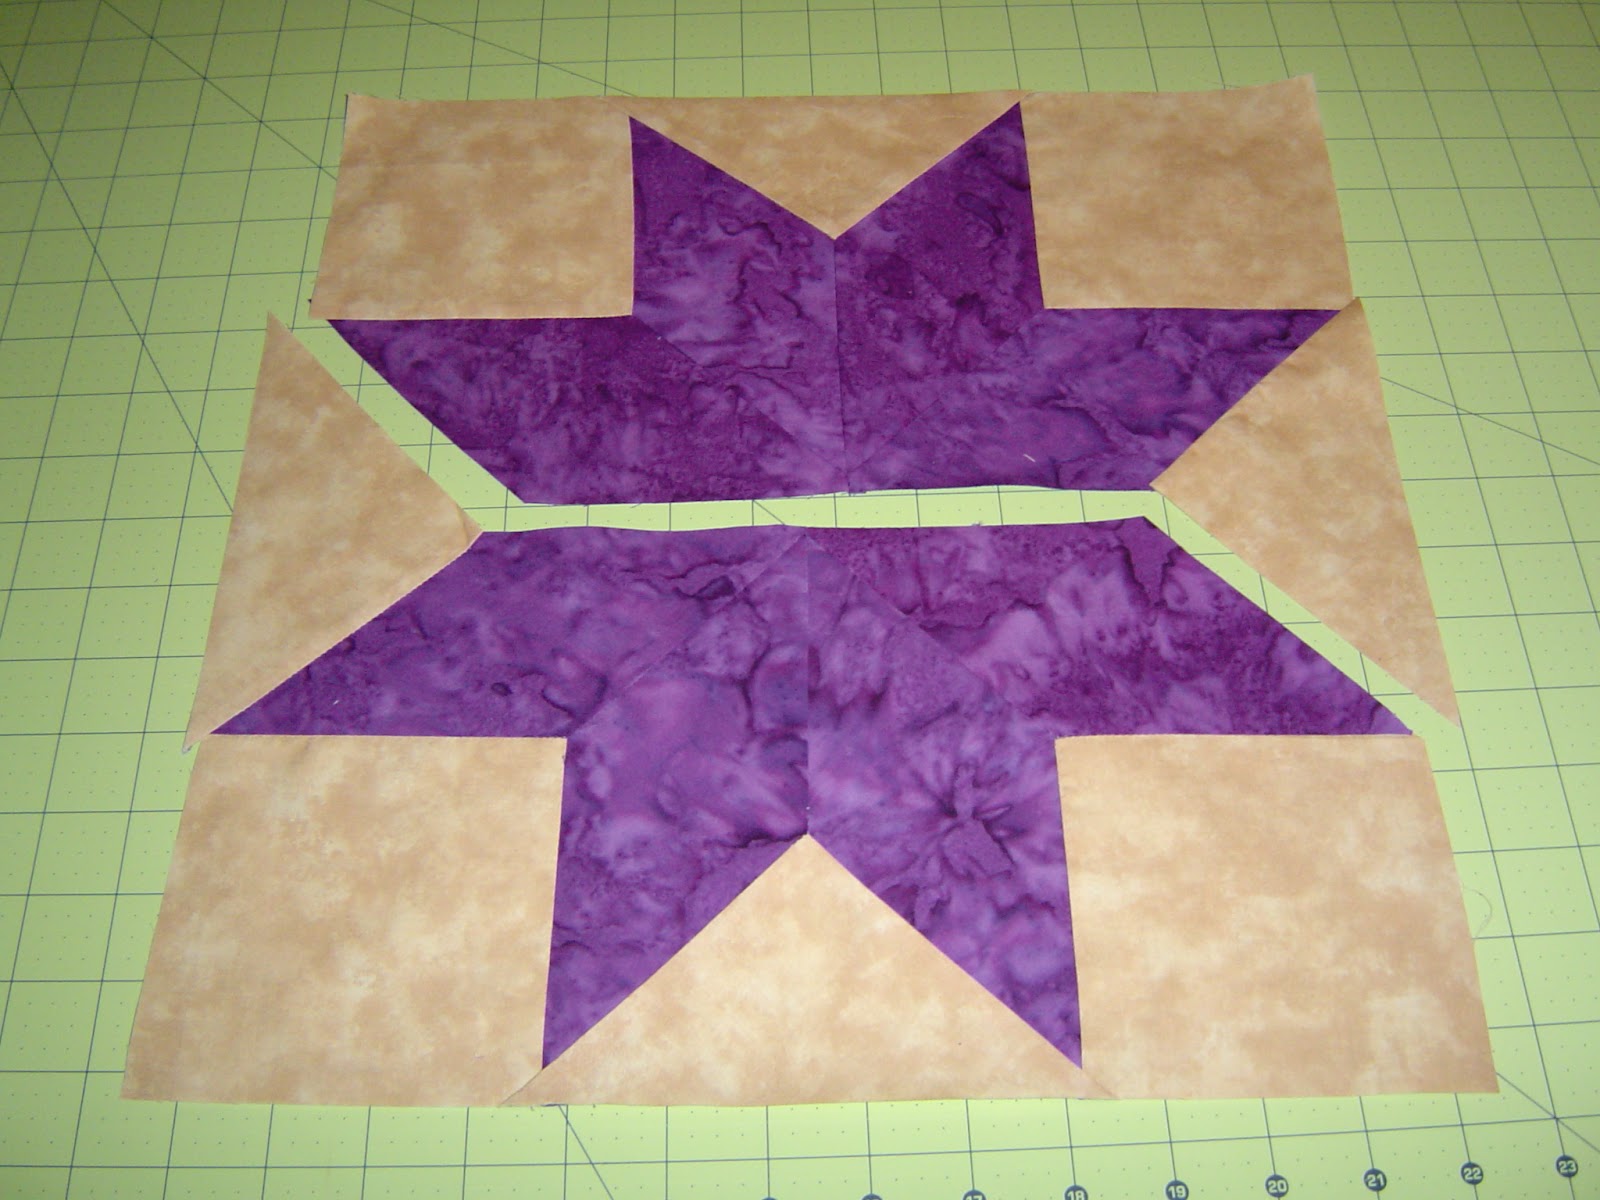
To prepare for the final assembly, attach a triangle to each star half.
The final result....


No comments:
Post a Comment